Saturday, September 27, 2014

New obsession: POPCORN

Garlic Bread Popcorn

Source: allrecipes
Ingredients
  • 1/2 cup unpopped popcorn  
  • 3 tablespoons butter, melted  
  • 2 tablespoons grated Parmesan cheese  
  • 1/2 teaspoon garlic salt, or more to taste  
  • 1/2 teaspoon dried crushed rosemary (optional)
Directions
  1. Pop popcorn in a air popper or on stove. 
  2. Transfer to a large bowl. Drizzle butter over popcorn; stir to evenly coat. 
  3. Sprinkle Parmesan cheese, garlic salt, and rosemary over popcorn; toss to coat.

Told you we're into the blackened fish.

 Grilled Tilapia Bowls with Chipotle Avocado Crema
Ingredients
Tilapia Seasoning
  • 1 teaspoon chili powder
  • 1 teaspoon paprika
  • 1 teaspoon of cumin
  • 1 teaspoon of garlic powder
  • ½ teaspoon of salt
  • ¼ teaspoon of pepper
  • 2 large tilapia filets
Chipotle Avocado Crema
  • ½ cup of plain Greek yogurt
  • juice of one lime
  • 1 large avocado
  • 1 garlic clove
  • 1 chipotle pepper {from a can of chipotle peppers in adobe sauce}
  • salt & pepper
Other Ingredients
  • 3 cups of cooked quinoa
  • 15 oz. black beans, rinsed and drained
  • 2 ears of fresh corn, shucked
  • ¼ cup of fresh cilantro
  • 1 roma tomato, diced
Directions
  1. In a food processor, add plain yogurt, juice of 1 lime, avocado, garlic clove, chipotle pepper, salt and pepper. Blend until smooth. Place in refrigerator.
  2. In a small bowl, add chili powder, paprika, cumin, garlic powder, salt, and pepper. Mix together.
  3. Rinse and pat dry tilapia filets and season bowl sides of the fish with the seasoning in the small bowl. {you may have some left over and that's fine}
  4. Heat grill to medium high, grill the two ears of corn for 15-20 minutes. Turning the corn every 5 minutes.
  5. Next, grill tilapia for 3-5 minutes on the first side and 3-5 on the second.
  6. Remove both from the grill and set aside.
  7. Assemble your bowls, place ¾ cup of cooked quinoa in a bowl, then add in black beans, diced tomato, fresh grilled corn {that has been cut off the cob}, cilantro, tilapia, and then top with Chipotle Avocado Crema.

We will definitely not be buying granola anymore

Homemade Coconut Oil Honey Almond Granola
Ingredients:
  • 1 cup almonds, divided
  • 3 cups old fashioned oats
  • 1/2 teaspoon salt
  • 1/3 cup brown sugar
  • 1/3 cup honey
  • 3 tablespoons coconut oil
  • 1/4 teaspoon vanilla extract
  • 1/8 teaspoon almond extract
Directions:
  1. Preheat oven to 350 degrees.
  2. In a food processor or blender, pulse half of the almonds until they are very finely chopped. Pour them into a large bowl. Then chop the other half of the almonds coarsely, and pour them into the same bowl.
  3. Pour the oats, salt, and brown sugar into the bowl with the almonds and stir to combine.
  4. In a small microwaveable bowl, combine honey and coconut oil, and heat for 40 seconds. Stir to dissolve the coconut oil, and add the vanilla and almond extract.
  5. Pour the honey mixture over the oats, and stir so that they are evenly coated.
  6. Pour the oats evenly onto a Silpat or parchment lined baking sheet (helpful if it has sides).
  7. Bake the oats for 5 minutes, and then stir them around. Return to the oven for 5 more minutes.
  8. Pour the granola and onto a piece of wax paper to cool. Spread it out into a thin layer.
  9. After it cools completely, break the granola into clusters and store in an airtight container.

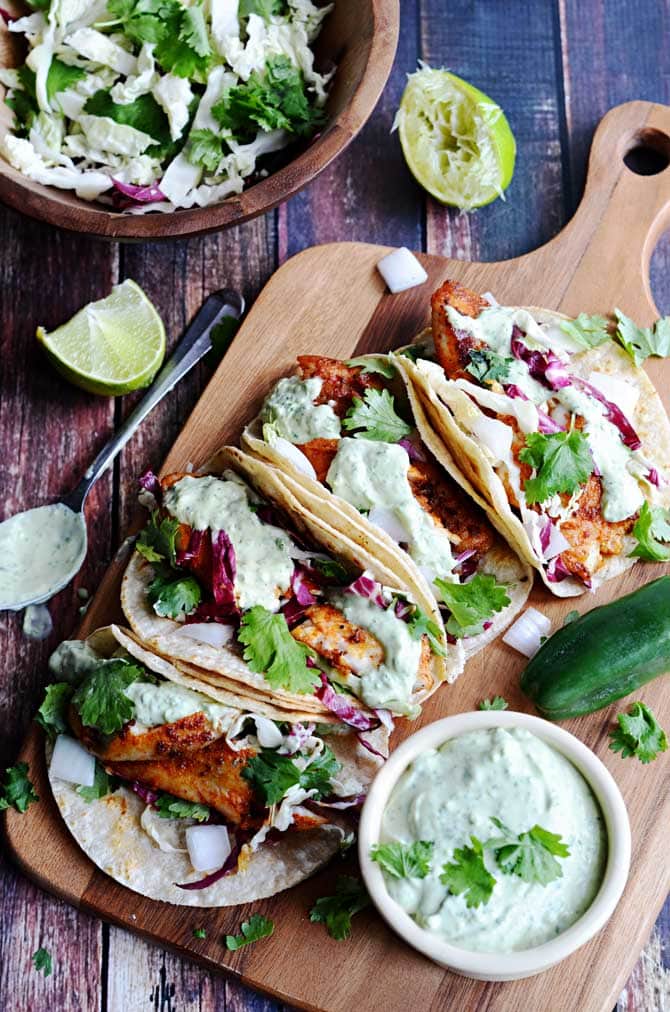
We have really gotten into blackened fish as of late...

Blackened Fish Tacos with Avocado-Cilantro Sauce
Source: host the toast

Ingredients
blackened fish
  • 1.5 lbs tilapia fillets
  • 1 ½ teaspoons smoked paprika
  • 1 teaspoon garlic powder
  • 1 teaspoon dried oregano
  • 1 teaspoon onion powder
  • ½ teaspoon cumin
  • ½ teaspoon salt
  • ½ teaspoon brown sugar
  • ¼ teaspoon cayenne pepper
  • 2 tablespoons canola oil
  • 12 corn tortillas
slaw
  • ½ red cabbage, sliced thin
  • ¼ green cabbage, sliced thin
  • ½ medium-sized onion, diced
  • ½ cup cilantro
  • Juice of 1 lime
avocado-cilantro sauce
  • ½ cup sour cream
  • 1 ripe avocado, pitted and skinned
  • ¼ cup cilantro, chopped
  • Juice of 1 lime
  • 1 jalapeno, chopped and seeded
  • Salt, to taste
Directions
  1. In a small bowl, combine the smoked paprika, garlic powder, dried oregano, onion powder, cumin, salt, brown sugar, and cayenne pepper. Sprinkle the mixture over both sides of your tilapia fillets, and then rub the seasonings in.
  2. Combine all of the Avocado-Cilantro Sauce ingredients in a food processor or blender. Pulse until well-combined.
  3. Combine all of the Slaw ingredients in a large bowl and mix well.
  4. Heat the oil in a heavy-bottomed pan over medium-high heat. Once heated, add in the tilapia (a few at a time if you can't fit them all at once). Cook for 4-5 minutes on each side, or until the outside is blackened and the fish flakes apart easily.
  5. Remove the fish from the heat, and if desired, warm the corn tortillas in the same skillet over medium heat, cooking for about 30 seconds on each side.
  6. Break up the tilapia into 2-3" pieces. Stack the tortillas in twos. Distribute the fish evenly between the 6 sets of tortillas, and top with Slaw and Avocado-Cilantro Sauce. Serve.

It's the little things in life... Like pizza that wisks you back home with every bite...


New York-Style White Pizza
Source: serious eats
Ingredients
  • 1 New York-Style Pizza Dough ball (recipe follows), or dough of choice
  • 1/2 cup White Sauce (recipe follows)
  • 1 1/2 cups ricotta cheese
  • 1/4 teaspoon salt
  • 1/4 teaspoon dried or chopped fresh thyme
  • 1/8 teaspoon coarsely ground black pepper
  • Mozzarella cheese, grated
  • 1 tablespoon chopped fresh flat-leaf parsley
  • Unbleached high-gluten or bread flour, cornmeal, or semolina flour for dusting peel
Directions
  1. Place a baking stone on the middle shelf of the oven and preheat on the highest setting for at least 1 hour. Shape the dough ball using the toss-and-spin method, stretching it to a diameter of about 12 inches. The dough should be about 1/4 inch thick and slightly thicker toward the edge. Transfer the dough to a peel or an inverted sheet pan that has been dusted with flour.
  2. In a bowl, stir together the ricotta, salt, thyme, and pepper. Set aside.
  3. Spread the White Sauce over the surface of the dough, leaving a 1/4-inch border uncovered. Spread the ricotta mixture evenly over the White Sauce. Spread Mozzarella cheese over top of pizza.
  4. Carefully slice the pizza from the peel onto the baking stone. It should take about 12 minutes to make. When it is done, the crust should be crisp and slightly charred on the edge and the cheese should be bubbling and just beginning to caramelize. The underside of the crust should be brown and crisp, not white and soft.
  5. Remove the finished pizza from the oven and garnish it immediately with the parsley. Let the pizza cool for about 3 minutes before slicing and serving. If you want a “snappier” crust, let the pizza cool completely, then return the individual slices to the hot oven for re-crisping.

New York-Style Pizza Dough
Ingredients
  • 5 cups unbleached high-gluten or bread flour
  • 1 1/2 tablespoons sugar or honey
  • 2 teaspoons table salt or 3 1/2 teaspoons kosher salt
  • 1 1/2 teaspoons instant yeast
  • 3 tablespoons olive oil or vegetable oil or solid vegetable shortening
  • 1 3/4 cups room-temperature water (70°F)
Directions
  1. With a large metal spoon, stir together all the ingredients into a 4-quart bowl or the bowl of an electric stand mixer until combined.
    **If mixing with an electric mixer, fit it with the dough hook and mix on a low speed for 4 minutes, or until all the flour gathers to form a coarse ball.
  2. Let the dough rest for 5 minutes, then mix again on medium-low speed for an additional 2 minutes, or until the dough clears the sides of the bowl and sticks just a little to the bottom. If the dough is too soft and sticky to hold its shape, mix in more flour by the tablespoonful.
    **If mixing by hand, repeatedly dip one of your hands or the spoon into room-temperature water and use it much like a dough hook, working the dough vigorously into a coarse ball as you rotate the bowl with your other hand.
  3. As all the flour is incorporated into the ball, about 4 minutes, the dough will begin to strengthen; when this occurs, let the dough rest for 5 minutes and then resume mixing for an additional 2 to 3 minutes, or until the dough is slightly sticky, soft, and supple.
    **If the dough is too soft and sticky to hold its shape, mix in more flour by the tablespoonful; if it is too stiff or dry, mix in more water by the tablespoonful.
  4. Immediately divide the dough into 3 equal pieces. Round each piece into a ball and brush or rub each ball with olive or vegetable oil. Place each ball inside its own zippered freezer bag. Let the balls sit at room temperature for 15 minutes, then put them in the refrigerator overnight or freeze any pieces you will not be using the next day.
  5. The next day, remove the balls from the refrigerator 2 hours before you plan to roll them out to take off the chill and relax the gluten.

White Sauce
- makes about 1/2 cup -
Ingredients
  • 2 tablespoons olive oil
  • 1 small yellow onion, diced
  • 2 clove garlic, minced
  • 1/4 cup heavy cream
  • 1/2 teaspoon minced fresh thyme or marjoram
  • Salt and freshly ground black pepper
Directions
  1. In a heavy saucepan, heat the olive oil over medium heat. Add the onion and sauté for 5 or 6 minutes, or until translucent. Add the garlic and stir for 1 minute longer.
  2. Add the cream, lower the heat to medium-low, and cook for about 3 minutes, or until the cream thickens and reduces slightly.
  3. Remove from the heat, stir in the thyme, and season to taste with salt and pepper. Let cool completely before using.

I LOVE NAKED. Juice that is. :)

Naked Juice Mighty Mango
Source: chelsea's messy apron
Ingredients
  • 2 cups (1 and 1/4 of a large mango) mango, peeled and cubed
  • 5 and 1/2 tbsp. orange juice
  • 1/4 cup apple juice
  • 1/3 (3 tbsp. mashed) ripe banana
  • 1 and 1/2 tbsp. lemon juice
Directions
  1. Combine all of the ingredients into a blender.
  2. Blend until smooth and no fruit chunks remain.
  3. Enjoy immediately.

GET THAT CORN OUTTA MA FACE

Sriracha Spiked Street Corn
Source:camille style
Ingredients
  • 4 ears of corn, shucked and split in half to form 8 pieces
  • extra-virgin olive oil
  • garlic salt
  • 1/3 cup mayonnaise (I prefer classic Hellmann’s)
  • 1 tablespoon sriracha sauce
  • a bunch of cilantro, roughly chopped
  • a couple tablespoons chili powder
  • 3 limes, each cut into 6 slices
  • course flake salt, like Maldon
Directions
  1. In a small plate, pour a bit of olive oil and roll the corn in it to evenly coat. Sprinkle all over with garlic salt.
  2. Heat a grill or grill pan to high heat, and grill the corn until slightly charred, about 5 minutes. Turn occasionally to cook on all sides.
  3. In a small bowl, combine the mayonnaise, sriracha and a squeeze of lime juice. Whisk to combine.
  4. When the corn comes off the grill, slather it with the mayonnaise mixture, than sprinkle with cilantro, chili powder and a sprinkle of coarse salt. Roll all the corn cobs around in the mixture to get it all evenly coated, and serve with slices of lime so guests can squeeze more juice as they like.
  5. Embrace the messiness… I promise, it’s worth it.

Bacon Makes Everything Better

Apple Bacon Coleslaw
Source: moms test kitchen
Ingredients
  • 1 bag (1 pound) coleslaw mix
  • 1 bunch green onions, diced
  • 1 lunchbox sized granny smith apple, diced
  • 1 container (8 ounces) sour cream
  • 1/4 cup apple cider vinegar
  • 1/3 cup honey
  • 1 small lemon, juiced
  • 1 navel orange, juiced
  • 6 ounces (about 8 slices) centercut bacon, cooked crisped & crumbled
Directions
  1. Add the coleslaw mix & the green onions to a large bowl with a lid. Toss in the diced green apples & half of the crumbled bacon.
  2. In a small bowl, mix together the sour cream, vinegar, honey & the juice from the lemon & orange. I put it all in a tupperware bowl with a lid & gave it a really good shake.
  3. Spoon the dressing over the coleslaw mix using as much or as little of the dressing to your taste ~ I used about 3/4 of the dressing mix, not all of it. Cover & refrigerate until ready to serve, preferably at least a few hours.
  4. Add in the rest of the crumbled bacon right before serving. 
 **As you can tell, I stopped attempting to take beautiful food pictures... :)

Tuesday, September 23, 2014

Homemade Granola is. the. best.

Salted Caramel Almond Granola
inspirations: joyful healthy eats and the pioneer woman
Ingredients
granola
  • 3 c old fashioned oats, toasted
  • ½ c flax seeds
  • 1 c almonds
  • 2 Tbsp honey
  • 1 Tbsp coconut oil
  • ½ tsp sea salt
caramel sauce
  • 1/2 c brown sugar
  • 2 Tbsp butter
  • 1/4 c half-and-half
  • 1 tsp vanilla
  • pinch of salt
Directions
caramel sauce
  1. Mix all ingredients in a medium saucepan over medium-low to medium heat. Cook while whisking gently for 5 to 7 minutes, until thicker. 
  2. Turn off heat. Serve warm or refrigerate until cold.
**If sauce is thin, just continue cooking for a few more minutes.
granola
  1. Line a large baking sheet with parchment paper. Set aside. Preheat the oven to 300°F.
  2. In a large bowl, toss together the toasted oats, flax seeds, and almonds. Set aside.
  3. Pour the caramel over the oats and almonds and toss to coat.
  4. Mix the honey and oil in a microwaveable bowl. Heat in microwave approximately 45 seconds, stir to combine. Scrape into the bowl.
  5. Use a spatula to turn the mixture over a few times. Scrape onto the prepared baking sheet in an even layer. Sprinkle with the sea salt
  6. Bake for about 30 minutes. Let it cool completely. The granola will scrape off the parchment in oat clusters.
  7. Enjoy this most delicious treat! :)

Tuesday, August 19, 2014

EVEN BETTER BROWNIES

Peanut Butter Cheesecake Brownies
source: dassant.com
Ingredients
Brownie Layer
Cheesecake Layer
  • 1- 8 oz. package cream cheese
  • 1/3 c creamy peanut butter
  • 1 tsp vanilla extract
  • 1/2 c granulated sugar
  • 2 large eggs
  • 2 T heavy whipping cream
  • 2 T all-purpose flour
  • 2 oz. bittersweet chocolate - chopped
Directions
  1. Prepare brownies as directed, without baking.
Cheesecake Layer
  1. Beat cream cheese, peanut butter, and vanilla in medium bowl using electric mixer until smooth. Gradually add sugar, beating until fluffy. Beat in eggs one at a time. Add cream, then flour. Transfer 1/3 cup cheesecake batter to small bowl and reserve. Spread remaining batter over brownie layer.
  2. Microwave chocolate in bowl on low power in 10-second intervals until melted, then stir until smooth. Mix chocolate into reserved cheesecake batter and drop by heaping spoonfuls atop cheesecake layer. Using the tip of a knife or toothpick, swirl chocolate batter in figure-eight pattern through white cheesecake layer for a decorative look.
  3. Bake brownies until center feels set and edges of cheesecake are puffed, about 45 minutes. Cool brownies in pan on rack. Cover and chill at least 1 hour before cutting and serving.

OH MY GOSH BEST BROWNIES EVER

Deep Dish Brownies
source: jenny rambles 
Ingredients

  • 3/4 cup butter, melted and cooled (if you don’t melt the butter you will not be able to spread the batter around the dish)
  • 2 eggs (if you double, use 5)
  • 1 1/2 cups sugar
  • 1 1/2 teaspoon vanilla
  • 3/4 cup cocoa powder
  • 3/4 cup flour
  • 1/2 teaspoon salt
Add ins
  • 1 cup bittersweet chocolate chips
  • semi-sweet chocolate chips
  • nuts
 Directions
  1. Melt butter and set aside to cool (so you don’t scramble your eggs). Mix flour, cocoa and salt in bowl and set aside. Please note, if you have the time, it is totally worth it to brown the butter first.
  2. Cream together butter and sugar, mixing well. Add vanilla. Add eggs, one at a time, mixing well after each addition.
  3. Add flour/cocoa mixture in three separate additions, making sure all the flour is incorporated before adding more. Tip: start your mixer slowly! Cocoa powder flies everywhere. Hand mix in any nuts or chips.
  4. Line a 8×8 baking dish with parchment paper, spray parchment with cooking spray. Using a spatula or knife, spread the batter evenly in the dish. Tap twice on counter to release air bubbles. Tip: It can be hard to get the batter even because it is thick, so after 10 minutes of cooking you can take the dish out and give it a little jiggle to even things out.
  5. Bake at 350 for 40-45 minutes, until a toothpick inserted in the middle comes out with only a few crumbs. Tip: It’s ok if there are crumbs or batter on the toothpick! It means the brownies will be a little gooey and moist. With 3/4 cups butter, you’d have to bake them until they were bricks to get that toothpick clean.
  6. Let cool for 20 minutes. Then, remove brownies from pan and let cool for at least one hour before cutting. If you can stand it.

Monday, July 21, 2014

Multi-layered flavor = delish

CPK’s Kung Pao Spaghetti
Source: DANG Delicious ;)
Ingredients
  • 1 pound rice noodles
  • 2 tablespoons vegetable oil
  • 3 boneless, skinless thin-sliced chicken breasts
  • Kosher salt and freshly ground black pepper, to taste
  • 4 cloves garlic, minced
  • 1/2 cup dry roasted peanuts
  • 2 green onions, thinly sliced
  • sauce
  • 2/3 cup soy sauce
  • 1/2 cup chicken broth
  • 1/2 cup dry sherry(1/2 c. chicken broth, 1 T rice wine vinegar, 1/2 tsp. vanilla)
  • 2 tablespoons red chili paste with garlic, or more, to taste
  • 3 T sugar
  • 2 tablespoons red wine vinegar
  • 2 tablespoons cornstarch
  • 1 tablespoon sesame oil
Instructions
  1. In a small bowl, whisk together soy sauce, chicken broth, dry sherry, red chili paste, sugar, red wine vinegar, cornstarch and sesame oil; set aside.
  2. In a large pot of boiling salted water, cook pasta according to package instructions; drain well.
  3. Heat vegetable oil in a large skillet over medium high heat. Season chicken breasts with salt and pepper, to taste. Add to skillet and cook, flipping once, until cooked through, about 3-4 minutes per side. Let cool before dicing into bite-size pieces; set aside.
  4. Add garlic to the skillet and cook, stirring constantly, until fragrant, about 1 minute. Stir in soy sauce mixture and bring to a boil; reduce heat and simmer until thickened, about 1-2 minutes. Stir in pasta, chicken, peanuts and green onions.
  5. Serve immediately.

Korean Beef

Korean Beef
Ingredients
  • 1 lb lean ground beef
  • 1/2 cup brown sugar
  • 1/4 cup soy sauce
  • 1 Tablespoon sesame oil
  • 3 cloves garlic, minced
  • 1/4 teaspoon ground ginger
  • 1/2 - 1 teaspoon crushed red peppers (depending on how spicy you like it)
  • salt and pepper
  • 1 bunch green onions, diced
  • Rice, cooked
Directions
  1. Heat a large skillet over medium heat and brown hamburger with garlic in the sesame oil. 
  2. Drain most of the fat and add brown sugar, soy sauce, ginger, salt and pepper and red peppers. 
  3. Simmer for a few minutes to blend the flavors. Serve over steamed rice and top with green onions.

Saturday, May 3, 2014

QUIET BOOK

Apparently Russ has had several men ask him if I have started "nesting" yet. They told him that their wives started "nesting" (desperately cleaning their entire houses) about 2-3 days before their baby came. Well I have felt so miserable that even with the desire and drive to desperately clean my house I have not been able to do it. I instead found myself making a quiet book. Some days I would work on it for a few minutes and get bored. Other days I would have all this energy and drive to get it done and would work for HOURS. Often missing lunch and getting very sick because of it. Whole pregnancy required eating regularly. Fun. Anyway. I am now at 39 weeks and 2 days and it is officially FINISHED. YES. I made a whole quiet book. Now, I would LOVE to share patterns with you all... However, I didn't have any patterns! Except one. Which I WILL share. This was my basic process:
  1. Go to Michaels and buy a ton of felt and some odds and ends like big buttons, zippers, beads, puffy letters, puff paint, etc.
  2. Think of something that seems cool to do. Example: I remember we had a quiet book when I was a kid and I remember it having a braiding page. This braiding page was the face of a freckled girl with orangey-red yarn for hair to braid. So I was thinking a girls hair would be better than just some random ribbons or something... But since we're having a boy I kept trying to think of a way to make it more gender generic, so I thought "what if I did a Rapunzel theme instead?" Still kinda girlie of course but maybe a little cooler than Pippie Longstocking? So I moved onto step three.
  3. Search the internet for examples of what I'm thinking until I find something I like.
  4. Take the idea I found on-line and create and adapt it. This is the part that often took the longest. I would print out pictures of things from the internet or just freehand on paper. Then I would cut the paper out, place it on the felt and then cut the felt around the paper.
  5. Once everything is cut out you just have to do a LOT of sewing. I am not a huge fan of sewing so I put this part off until I had most of the book done, haha. But I kept misplacing pieces of the pages so I decided to bite the bullet and just sew the dang thing!
  6. Make a cover. We used some leftover fabric we happened to have and some batting. Voila! QUIET BOOK.
So here are some pictures of what I made! Nothing is brag worthy but it was a fairly fun project and I think a few pages turned out really cool! I keep thinking I could add more pages someday... But that would require making more pages! So I don't know how likely that is!! :)
 The cover... Obviously!
 A zipper and counting page.
 A cool old fashioned phone! The phone is just stuck on the page with velcro, he can pick it up and "talk" to people. There is also a little phone book with real phone numbers in it.
 A clock to practice telling time. I stumbled upon a picture of a clock with a mouse and thought it was adorable, so OBVIOUSLY I had to add a mouse to mine as well!
 Simple boring shape match. Never found anything I loved so I just did a classic!
 4 seasons. I LOVED this idea. Especially since we live somewhere with no seasons... Or real trees...
 Rapunzel hair braiding page! The people are little dolls to play with, and one is a prince! Makes it more boy friendly right? :)
 Gumball machine color matching with giant buttons. Thought it would be a more fun way to practice color matching!
 Farm! This is the one and only page I had a pattern for. I obviously tweeked quite a few things, but the pattern saved SO MUCH TIME. And the funny thing? A friend of mine made the pattern... And I ACCIDENTALLY found it when I did a search! Love the animal finger puppets!
 A weaving page that is a pie. I thought that would be more fun than just some random pieces of fabric to weave!
And last but not least I thought it would be fun to have a dress up page. To make it more boy friendly I made a bunch of outfits for professions. I have a doctor, cop, construction worker, fireman, and chef! Most of them have hats too. 

Anyway, overall I enjoyed making my book even if it turned out a bit not great. Haha. The kid won't care. And he won't care how much TIME and EFFORT it took his mother to make this for him! So I shouldn't worry too much about how it turned out. :)

Saturday, April 12, 2014

I don't know if I'll ever want regular pancakes again

Pancake Mini-Muffins

source: the pioneer woman
Ingredients
  • 3 c Flour
  • 1 Tbsp Baking Powder
  • 3 Tbsp Sugar
  • 3/4 tsp Salt
  • 2-1/2 c Milk
  • 1 Tbsp White Vinegar
  • 2 whole Eggs
  • 1 Tbsp Vanilla Extract
  • 4 Tbsp Butter, Melted
  • Blueberries (optional)
  • Chocolate Chips (optional)
  • Warm Syrup, For Serving
Directions:
  1. Preheat the oven to 425 degrees. (**See note below.)
  2. Sift together flour, baking powder, sugar, and salt. Set aside.
  3. Stir together the milk and vinegar and let it sit for 1 minute. Whisk in eggs and vanilla.
  4. Combine dry ingredients and wet ingredients, then stir in melted butter. If batter is too thick, stir in a little milk.
  5. Spray a mini-muffin pan generously with baking spray. Fill cups 2/3 full. If using blueberries, drop 2 to 3 blueberries into each cup.
  6. Bake for 8 to 9 minutes, or until golden brown on top. Let sit in the pan for 1 to 2 minutes, then turn them out of the pan. (Use a small knife if any are stubborn.)
  7. Serve warm with warm syrup!
**425 will result in crisper edges. For a softer muffin, bake at 400 for 11 minutes.

Chinese Food Anyone?

Chinese Orange Chicken

source: DANG delicious
Ingredients
  • 1 1/2 lbs boneless, skinless, chicken breasts, cut into 1-inch chunks
  • 1 c + 2 Tbsp cornstarch, divided
  • 2 large eggs, beaten
  • 1 c vegetable oil
  • 1/2 tsp sesame seeds
  • 1 green onion, thinly sliced 
marinade
  • 1 c chicken broth
  • 1/2 c freshly squeezed orange juice
  • 1/2 c sugar
  • 1/3 c distilled white vinegar
  • 1/4 c soy sauce
  • 2 cloves garlic, minced
  • 1 Tbsp orange zest
  • 1 tsp Sriracha, or more, to taste
  • 1/4 tsp ground ginger
  • 1/4 tsp white pepper
Directions
  1. To make the marinade, whisk together chicken broth, orange juice, sugar, vinegar, soy sauce, garlic, orange zest, Sriracha, ginger and white pepper in a large bowl.
  2. In a gallon size Ziploc bag or large bowl, combine chicken and 2/3 cup of the marinade; marinate for at least 30 minutes, turning the bag occasionally. Drain the chicken from the marinade, discarding the marinade.
  3. Heat remaining marinade in a medium saucepan over medium heat. Bring to a boil and stir in 2 tablespoons cornstarch combined with 2 tablespoons water. Cook, stirring frequently, until thickened about 1-2 minutes; keep warm.
  4. Working one at a time, dip the chicken into the eggs, then dredge in remaining 1 cup cornstarch, pressing to coat.
  5. Heat vegetable oil in a large saucepan. Working in batches, add chicken and fry until golden brown and cooked through, about 1-2 minutes. Transfer to a paper towel-lined plate; discard excess oil.
  6. Serve chicken immediately, tossed or drizzled with the marinade, garnished with sesame seeds and green onion, if desired.

Monday, March 31, 2014

Nursery

Okay we have been incredibly blessed during our pregnancy to have so many friends getting rid of baby stuff! Nothing for our baby is new. It's all hand-me-down stuff. But hey, we saved hundreds of bucks and the kid won't know the difference! One of our friends gave us this simple white rocking chair and we decided to deck it out with a nice memory foam cushion. Russ was very creative and clever when he designed this little cushy seat cover. So now I have a great place to feed the baby and WE have a great place to rock him to sleep. SWEET.
So to make this bad boy we took some chunks of memory foam, which happened to be left over from when we made that massage table back in the day, and cut it up into the perfect sized pieces for both the bottom and back of the rocking chair (that is a major run on sentence but I can't fathom how to fix it at the moment...) He then took this cute little giraffe fabric we bought and made it kind of like a pillow case... Like the pillow shams you put on your bed to make it look pretty? They have over-lapping flaps on the bottom where you can slide the cushion inside. He also attached little strips of fabric to tie it to the chair with. Simple, but it works! And it's REALLY comfortable. So there you go! Nice hard rocking chair turned into a memory foam induced comfy chair.

Family Tree

Everyone keeps asking me what we are doing in the nursery. And honestly? I have no idea. We painted it green LONG before we knew what we were having. I'm not super girlie, so neither would my girl be. We are having a boy however so it really doesn't matter. Anyway. So the one and only thing we have done to decorate is make a giant, vinyl family tree. It is actually insanely cool. Russ got me a silhouette for Christmas (these things seriously rock) so we used a program called Inkscape (FREE by the way) and designed our tree. I had found a tutorial here that explains exactly how to use Inkscape to make a family tree. YAY. She made some sort of wall plaque while we cut out giant strips of vinyl. We did about 5 generations and made the tree about 4 ft by 4 ft. It's quite largeand AWESOME. It was quite the project, it took several hours over many days and effort on both mine and Russell's part. But it was TOTALLY worth it. It really is cool. Someday we will finish it by writing where everyone was born on the leaves, but as of right now, we're done. So now you can admire our handiwork.
 These are the largest names we printed out.
 Strip number one! We had two strips of vinyl this length.
 Print out of what Russell had done on Inkscape. We used it to make sure we put all the names in the correct place and lined everything up perfectly.
 The skeleton of our tree...
ALMOST finished. Like I said, we need to add where everyone was born. And our child's name... Which is currently undecided. Which is totally fine right? We have what, 5 weeks? :)
If you ever try one of our recipes we would love to hear your feedback! Let us know if you like them or if you make any changes! We love comments! :)

Followers

Related Posts Plugin for WordPress, Blogger...